beechwood pastel painting
 

HOME

GALLERIES

CD ROM

ART-E-BOOKS

 TECHNIQUES

PEN AND INK

LINKS


Derwent drawing pencil
 

Blending Coloured Pencils using Zest-it.

About four years ago my daughter 'took' to Coloured Pencils like 'a duck takes to water'. It was interesting to watch her approach to the materials:- we had a discussion on Watercolour paper and other supports - she tried them all to find what best suited her way of working.
We tested the various coloured pencils with Zest-it as a blending medium - Derwent Drawing pencils gave the blended result she was looking for, Zest-it worked so well with the waxy stripe of these coloured pencils and it leaves no marks or residue on the paper.
We also pondered the use of photographs and/or working from life - so, with digital camera in hand, pastels and coloured pencils in a 'hold all', accompanied with some sustenance, we took a few day trips out into the countryside.
I thought those of you interested in coloured pencil work, may like to see the results of her study and observation, also the techniques she uses.

 
She made colour charts of the Pencils on the different supports, the paper that has become her favourite is Whatman Hot Pressed 140 lb.
The charts on the right is Derwent Drawing Pencils on the same Whatman paper.
derwent drawing pencil colour chartsderwent drawing pencil charts
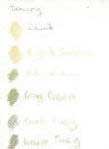
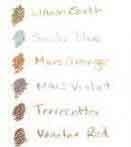
The examples on the right are Derwent Drawing pencils as they look applied to the Whatman paper and then blended with a brush using Zest-it Pencil Blend.

To have control over the amount of Zest-it used, she 'wets' a piece of kitchen towel, this is placed in a pot with a screw lid, she touches the brush on the towel to pick-up the required amount of Zest-it.
The brush she uses is fairly stiff but with soft filaments.

Experiment to find what suites you best.
blended coloured pencil with zest-it pencil blendcoloured pencil blended with zest-it pencil blend
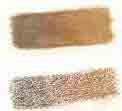
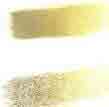
Click either, to see the blends in more detail.
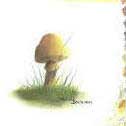
This was her first 'proper' coloured pencil painting, after all the playing, experimenting and generally getting to know your tools. Testing the colours on the side of a drawing is a useful practice whilst still getting use to the materials. She didn't aim for a masterpiece with her first one, which is a good attitude to take, (personally I think it's not far off), and she's rightfully proud of it.

With all of these pencil colours it's easy to make a 'wash' of the colour for under-painting. This mushroom was under-painted with "Wheat" from the Drawing range, it ties the painting together and also gives a tonal value to work from.

first mushroom with colored pencils
Click to see more detail

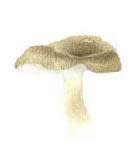
This was her second painting, it was drawn first using coloured pencil. The whole mushroom was under-painted using Zest-it Pencil Blend with "Wheat", for the main body and "Warm Grey" for the shadows under the cap. This was from life, unfortunately the mushroom deceased before the painting was finished, but I know she found it a good learning exercise. 

You may be wondering 'why mushrooms'? It's often best to start with something fairly simple but that you find interesting - mushrooms filled that criteria for her.

The study of them has paid off, because when we're at art show's, I'm painting with oils (of course!) and she is demonstrating 'pencil blending' - mushrooms of all shapes and sizes are now drawn and blended without a second thought!

second mushroom blended with coloured pencils
click to see the coloured pencil work on this Mushroom in more detail

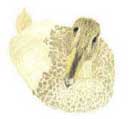
 If you apply further pencil before the Zest-it is dry, it will tend to 'drag' across the surface and look darker in colour, the colour will return to normal as the Zest-it dries. Using under-painting allows you to have colour without using up the tooth of the paper.

The Mallard on the right, is a work in progress, showing the under-painting and the building of layers as the painting progresses.

I hope this has given you an in-sight into using Zest-it Pencil Blend with your Coloured Pencils.

mallard picture using coloured pencils

 
We also have to say 'thank you' to her for the birth of the "Zest-it Pencil Blend". As many of you probably realise I am the founder and owner of Zest-it and 'the daughter' was not impressed with the vinegar spout on the smaller sizes! ~#*&%@+*&# (that's not swearing, it's the earache she gave me!) "Can you please do something about this Mum! I think we need etc. etc." So, the result of all of this, is the name she gave it Zest-it Pencil Blend, it's the same Zest-it brush cleaner, but it's in a smaller, more convenient size (50 ml) and no 'vinegar spout'! Phewwww! It's the fastest extension to the range to date!
Available from January 2005

Update May 2006 - the Zest-it Pencil Blend is now available in a 125 ml and a 250 ml size

Please note: The 125 and 250 ml Pencil Blend comes with the 'vinegar spout', if you don't like 'the spout' you can remove it, just be sure you close the bottle cap tightly afterwards to ensure a good seal.
If you want to be sure not to waste any Zest-it, empty the bottle into a clean glass container before removing the spout, then refill the bottle, close tightly and wash the glass container in warm soapy water after use. Emptying the bottle first saves any accidents as you remove the spout. One of the easiest ways to remove it is to use a single prong/tine of an old dinner fork, push it in the hole for about 1/8" to 1/4", then carefully prize/lever the spout from the bottle using a downwards action on the fork handle. A couple of points to note if you remove the spout - hold the neck of the bottle, not the squeezable part, use a cloth to hold the bottle so it doesn’t slip and make sure the top is closed tightly.
This is only a suggested method of removing the spout and it is your responsibility to make sure you do it with your safety in mind as we take no responsibly for any accident you may have when removing the spout.


                                              Artwork © Tracey Blackman

Back to Painting Techniques

Page copy protected against web site content infringement by Copyscape


Home   |  About Me   | Art-E-Books  | CD ROM  |  Directory   |  Galleries   |  Greetings Cards  |  Links  |   News  |   One-Stroke Brushes    |   Painting Techniques  |  Pen and Ink   |  Products  |   Search the Site   |   Video  |  Workshops


©  Jacqui Blackman 1999, 2000,2001,2002,2003,2004,2005,2006,2007
Artwork © Jacqui Blackman & © Tracey Blackman